Total Pageviews

Friday, October 11, 2013

MASTER BEDROOM DO OVER TAKE 1

Here's to peaceful sleep areas. Time to add some chill to your chill-zone. Bedrooms should be peaceful areas. This is one ginormous bedroom. Now that am soon vacating the premise I finally get 1 million ideas what I would have done with it.....more pictures less words.

Before,

I picked this bed ages ago, loved it then not feeling this style now.


Whoever invented the bed-in-a-bag was a genious even though I find the duvet color too bland, it works.


Fitted sheet went on.


Added an old nightstand in the mix, some of the hardware  might have fallen off over the year, so I decided to fix them.


Bedspread done.


Hardware about to be re-fixed,


Added a lamp, I keep moving this lamp and any other furniture from room to room. And the nightstand now looks like it's sister or brother. I lately am not feeling the lamp on both nightstands look so I do one lamp and other items on the opposite side.


I like how clean and simple this looks even with no art on top of the headboard.


On the other nightstand I did 3 items; a ceramic bowl that I use to keep coins, my new latest collectible - an hourglass, and a vase with faux plants that also moves from room to room.


Other view with the dresser that was also missing knobs.


I have no idea why these pictures look so blurred, I think I need to take 1 or 2 photography classes. Here's an up close of the nightstand.


There goes the wasted space....now I would probably put a loveseat, a table, some cute curtains and hang art on the wall opposite the window on the right.

The other lamp I used on the dresser,


Selfie mode.


All cleared up.


Selfie, thanks for reading.


Thanks for stopping by,

Till next post.

Dassa by Design.

Wednesday, October 2, 2013

LIVING ROOM

I decided to spruce up the living room a little bit right before we got packing up for moving day. This is my favorite part of this house and am sure gonna miss it a lot! I love the huge bay window, the floating-ness (yes that's a word) of the room, the glowing 20 year old hardwood flooring.I love it all!

Here's how it went down, I took a few before pics....I chose this furniture 4 years ago, now I can't stand the color and texture of it at all. I have come a long way with all things color, currently am in love with everything gray. The colors in this room are very safe and monochromatic. Am currently more daring with my colors, case in point...my Nairobi hot pink kitchen that I am hugely embarrassed of or by. Also the lease on this house did not allow to drill on the walls, most art had to be glued in or stapled, sigh!


Took pictures from all angles, it's a long room and once again..photography is not my stronghold. 


I hung some art on either  side of the window. The sheers were here when we moved in, I tried to change them but could not get anything as long as the existing ones. In a perfect world, I would have gone with a sage hue for sheers probably on a rod pocket, I love rod pockets. I also put the lamp on a cute end table and added a vase with decorative sticks for a little drama.


That chandelier, I also love. It hangs above the entry door downstairs and looks really awesome at night.


Different view of the room, the masai batik I got from the gallery and curio shops at Hilton Nairobi a while back.


Thanks for stopping by. Have a fabulous day or night. 

Till next post,

Dassa by Design.

Thursday, September 26, 2013

WALL GALLERY: DOCTOR'S OFFICE


I took my little pwincess to her pediatrician this week and fell in love with this gallery wall at their reception. The buttery yellow background makes the black 'n' white photos pop! That they are artistic photos of newbies even makes it more cute (chuckles). I really really really loved this wall. Pictures were taken in a hurry but still look great right? 


I will definitely use this battery background as an inspiration for a gallery wall in future. Thanks for stopping by, have a fabulous day.

Till next post,

Dassa by Design.


Tuesday, September 24, 2013

MINI DO OVER : DINING ROOM

I recently did a mini do-over (for my dear mother), organized her dining room that was crying for a little TLC. I would have loved to go all out and do some painting, some window treatment, hang some art, change the lighting etc etc but I only had 30 mins and owner wasn't emotionally ready for the whole 9 yards. I had to do it fast before she could change her mind.

Here's how it went down.

We stripped off the wall-to-wall carpet and the anti-slip rug that was under the carpet.


Took all the furniture out of the room. For the record, I love these leather dining chairs, the intricate workmanship between the panels just blew me away.


Next I organized the room a little.


Table all cleared up.


Brought everything else back in the room. Never mind the rug, I had to clean the floor it kinda got it's way back into the picture.


Found this vase with faux flowers lying around in the house and decided to use it as a centerpiece.


Now those fancy plates that nobody uses but they have them anyway would look good in my picture. Am not so much into cutlery arrangement but did it anyway.


Aerial view of the piece de resistance haha.


The final shot.


Night mode. Love the chandelier and I hate the vertical blinds on the window *cringe*. Now if only my mom would let me paint her walls next time and swap some elegant curtains for those stiff blinds next time, Oh well!


MY DESIGN DIAGNOSTIC FOR THIS ROOM:

1. Some wall art wouldn't kill anyone....you could even display pictures of your children *hint hint*
2. A fresh coat of  paint would add so much zing in this room.
3. Get a better centerpiece mom LOL.
4. Those blinds HAVE to go.
5. The baseboards would look so much better if you got new ones.

Thanks for stopping by, till next post. Bye!

Dassa By Design.

Sunday, September 22, 2013

FOODIE POST: CHICKEN MUSHROOM CASSEROLE.

I made this yummy recipe that I got off you tube. I customized it a bit cuz I couldn't find 2 ingredients but it turned out great all the same. This was my first time making a casserole and I wasn't sure if I would like it. Here's what I used for ingredients...it made enough to serve 4.


A few pieces of boneless chicken. 

Mushrooms about 1 cup.

Pasta 1.5 packets boiled al dente.

Some milk. 

1 tablespoon ground oatmeal.

1/4 red onion diced.

2 cloves garlic crushed.

3 tablespoons tomato paste.

Some olive oil.

Shredded cheese.

STEPS

1. Cut the chicken into thin strips and put in a bowl.

2.Sprinkle some salt, spices of your liking, 2 table spoons of olive oil, 3 tablespoons tomato paste onto the chicken let in marinate a little.

3 . Sauté onion, garlic and mushrooms in a pan till the mushrooms begin to stew up add some milk and stir continuously. I used  oatmeal to thicken up the milk since I didn't get any can of cream of mushroom at the store. Let the mixture sit on the counter. 

4. In a separate pan heat some oil. Add the chicken and stir fry till done.

5. Now take the chicken and mix it into the mushroom stir and leave to simmer for 5 mins.

6. Add the pasta to the mix and stir till ingredients are evenly spread. Grease an oven pan. Pour mixture into pan and sprinkle some cheese.

7. Your oven should have pre- heated by now. Bake casserole for 20 mins in 450F.

8. When ready let it cool for a few minutes then dig in. Yum yum.

The mixture all mixed up.


Sprinkled some mozzarella and cheddar cheese though the recipe called for parmesan cheese.


Blurry picture but very yummy.


Thursday, September 19, 2013

THE SIMPLE THINGS IN LIFE - H : )PPY CUPS!

I stumbled upon these cute colored cups in my mum's cupboard and instantly fell in love with the colors. Each cup seems to say a story of it's own. It's like they each have a personality. Took a few pics too, it's weird but such stuff put a smile on my face : )  How beautiful is her table's finishing? I love it! It feels very earthy and woody.
She also had a set of plates or platters that I loved.. who am I kidding? I got them for her last year but she doesn't use them...she keeps them, for what exactly? I don't know. 

Wednesday, August 28, 2013

DIY PROJECT: THE ART OF WALL ART

This is one of the easiest DIY projects I did for my house. I kinda sorta live in a cave, you know dark walls, dark couch, darker floor rug. I am personally drawn to dark colors and unless am designing for a client, pop of color doesn't really work for me (I will do another post of how I went all bright with my kitchen and ended up with a disaster). Needless to say, I decided to pop some color into my dark world...dark ages.

I made some wooden frames, cut up fabric. Some nails and glue and POW! Instant wall art! Here's pics of how this went down. DISCLAIMER: windows have no sheers ( I have an open window policy for the living room that no one else understands)


Cut up the fabric, hand-drawn Chevron print from IKEA. It's actually their current collection. Added some white and red pieces, locally sourced.


Some of them may have gotten out of line...or not, depends on the angle you look at it from. I hung them a bit higher because I live with my little human being, you can imagine what she would do to them in a second! I tried to convince other occupants of my house on doing six of them and placing them in two columns of three but they would hear none of it, so we mutually agreed on one column of four instead.


I tried the look on the floor next to a Dassa by Design cross-legged bench stool from last year's furniture collection.


Or unbalanced, one frame on the stool, one on the floor and what looks like a piece of paper on the floor, oh well! 


I later took all the frames off the wall, color doesn't work for me. It's all about what you are comfortable with, right? Do you need some wall art? Email us at dassabydesign@gmail.com, even easier call us on 0711 643 630 give us dimensions , choose fabric from our fabric collection and add some wow to your wall.

Thanks for stopping by.

Till Next Post,

Dassa by Design.

BATHROOM BLISS

I have been behind on my blogging, we have had several furniture pieces to design and produce and several design projects. So here's the deal, client confidentiality, people hate to have their houses posted online and we totally respect that. For pictures of most of our projects booking a one-on-one seems to be the only way out for now. I will be posting some pics from our own design studio soon. 

Enough with that already, bathroom design. We always forget the bathroom when designing our homes. We spend about 20 minutes a day in that little room. The bathroom is basically one of the few places where we can be totally alone, or not.Here's a few ways to add some zing to your little room. Photos courtesy of the good old www .

A fresh coat of paint! Bathrooms are supposed to feel peaceful, green is a calm, peaceful color. We love this shade of sage on this wall. Pair it up with understated accessories like a framed mirror in a cool color like this white. If you need extra storage you could do an expedit and fill it with wicker baskets, bathroom towels, paper towels, candles or even books and magazines.


If your bathroom is super-tiny, you might want to maximize on vertical space for storage. There is no better way than to use floating shelves. Floating shelves give you a clean, clutter-free, contemporary look. Use the shelves to store towels, your cologne collection, fancy bottles and any other decorative vases you might have for your bathroom.They can go anywhere on the wall ; above the toilet seat, above the wash basin, on the opposite wall...anywhere!


Bathroom monochrome! Paint a small room in one color, like the walls and ceiling in this bathroom and the flooring all in the same color.


 If you are a more traditional person, a good old under-the-sink vanity like this will save you lots of trouble. It keeps your bathroom items away from the human eye and still looks neat on the outside. You can do marble on the counter top and display a vase with fresh flowers....or not so fresh plastic imitations.


Personally, I would die to have this bathroom, I love everything contemporary. Small bathrooms can look great with a pedestal wash basin like in this black and white bathroom. The black Lucite glass table adds some mystery and unusual drama to the space.


We all dream of the bathroom above but this other cute girly bathroom is more real-life real-money situation. You don't have to rob a bank to make your bathroom look welcoming. A smaller budget can make you this ceiling to wall bathroom shelves. The shelves provide lots of storage space for both necessary bath items and decorative items.


How modern can a bathroom get while still maintaining it's functionality even creating space for a washing machine? We love the glass shelves and the glass shower cubicle. This is perfect use of space for a house with no separate laundry area.


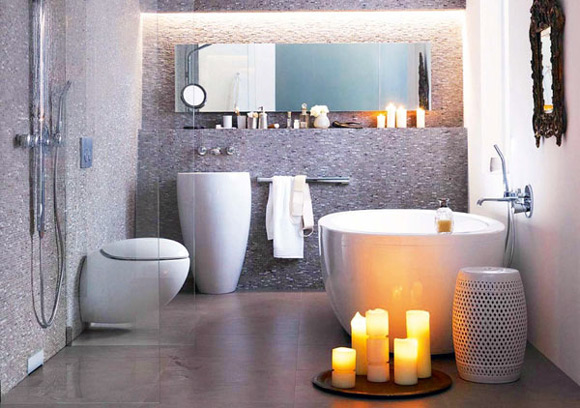
This bathroom has zen written all over it. From the long wall mirror, to the bathtub, the glass shower cubicle and the tulip wash basin...how could I forget the huge candles? This is a tiny bathroom with big potential, also gets extra points for the spa-feel.
 

If you are remodeling your bathroom, a bright color of glass mosaic to the base of the tub will add some glitz to your bathroom. Mosaic tiles are locally available (well not locally because they import them but they have them in stores) in hundreds of colors. I was going to do mosaic wall tile in my kitchen but this looks lovely as well. 


You live in a rental apartment or house, landlord wont let you paint his or her walls? That is no excuse to live in a boring world with no color, add color to your space with a bright shower curtain, soap dispensers in popping colors, bright towels, bath mats yes even trash cans.


Or you can go rebellious with some wallpaper. There is no point in  doing something wrong halfway, if you are going to do something wrong (read tamper with your rental lease), do it right. We say the brighter the wallpaper the less the guilt. Don't you just love this bathroom, it is very romantic!


That's it on small bathrooms. You need to remodel your bathroom, get some one-on-one design tips? Shoot as an email at dassabydesign@gmail.com

Thanks for stopping by,

Till Next Post,

Dassa By Design.